
If you want to rock the piano like a pro, mastering your chords is non-negotiable. Rock piano chords aren’t just a skill—they’re your secret weapon. With them, you can learn songs faster, transpose into any key, write your own music, and make the same chord sound fresh in different ways.
Here are 3 essential tips to get your rock piano chops screaming in all 12 keys. And don’t forget—our full video lesson on rock piano chords will take you even further!
Music and math? Believe it or not, there’s a formula to make your chords bulletproof. Triads—major and minor—are the bread-and-butter of rock piano chords, and learning to build them in any key is a game-changer.
Here’s the shortcut:
Once you can do this in all 12 keys, you’ll have the core toolkit every rock pianist dreams of.
💡 Pro tip: Think in scale degrees: root (1), 3rd, and 5th. That’s your chord DNA.
In order to build a major triad, we need to find the first 5 notes of a major scale. Below are the first 5 notes of a C major scale.
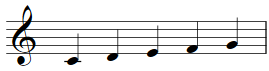
Now let’s look at the “formula” for building the first 5 notes of a major scale. We call these notes scale degrees. The 1st scale degree is also called the root. In order to move from the root to the 2nd scale degree (C to D) we move up a whole-step. From the 2nd to 3rd, another whole-step. From the 3rd to 4th, a half-step. And from the 4th to 5th, a whole-step.
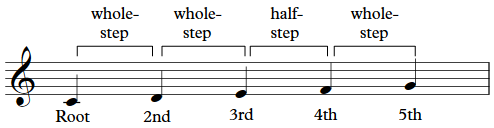
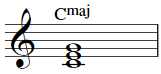
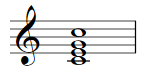
In order to build a major triad, simply play the root, 3rd, and 5th all at the same time.
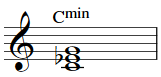
And in order to turn this major triad into a minor triad, simply lower the 3rd degree a half-step.
Here’s where things get really fun. Your triads don’t have to sit in one position. Switch things up:
These inversions make your chords more flexible, dynamic, and full of life. Suddenly, your playing sounds more professional and exciting!

Want your chords to fill the room? Add a 4th note by doubling your lowest note an octave higher.
For example, a C major triad (C-E-G) becomes C-E-G-C (octave up) and BOOM!—your chord sounds thicker, richer, and pure rock energy.
Do this with all your chords and watch your piano playing explode with power and presence.
A focused 6-week deep dive into the feel, technique, and soul of rock piano — using Elton John's "Guess That's Why They Call It the Blues" as your complete performance vehicle.
🎹 Check out the full program and reserve your spot today:
👉 Rock Piano Intensive Details
Don’t just play the piano—make it rock! ⚡
Jazz piano chord shells are one of the most important left-hand tools you can learn as a jazz pianist. If you’ve ever wondered how great players move smoothly through changes, chord shells are the foundation.
Shell voicings are one of the most essential left-hand tools in jazz piano. They simplify your playing, clean up your sound, and create the harmonic foundation for bass lines, comping, and advanced rootless voicings.
In this guide, you’ll learn what chord shells are, why every serious jazz pianist uses them, and how to start practicing them correctly.
A chord shell is the stripped-down framework of a chord. Instead of playing a full four-note voicing, you play just two essential tones in your left hand:
These two notes clearly define the harmonic function of the chord. The 3rd determines whether the chord is major or minor. The 7th determines whether it’s dominant or minor. Together with the root, they outline the chord without cluttering your sound.
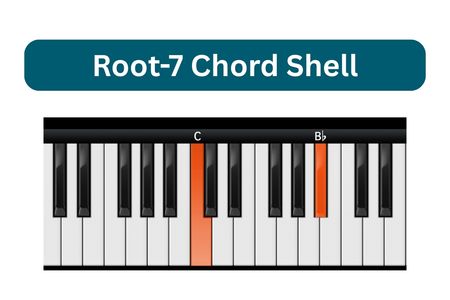
The Root–7 shell is extremely common in jazz piano comping. It works beautifully on dominant 7th chords and minor 7th chords. Because the 7th defines the tension and character of the harmony, this voicing creates a strong, clear foundation.
This shell is especially effective at faster tempos because it is easy to grab and keeps your left hand stable.
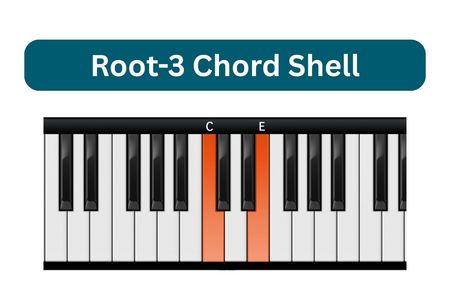
The Root–3 shell is powerful because the 3rd clearly defines whether the chord is major or minor. When you use this voicing, the harmony becomes unmistakable, even though you’re only playing two notes.
Alternating between R7 and R3 shells creates variety while keeping your left hand simple and controlled.
If you listen carefully to great jazz pianists, you’ll hear shell voicings constantly. Here’s why they rely on them:
Want to see these concepts demonstrated at the piano?
Watch the full lesson here:
5 Reasons Every Jazz Pianist Uses Shell Voicings
Chord shells aren’t just static shapes. You can break them apart rhythmically to create movement.
Instead of playing the shell as a block chord, try alternating:
This creates a strong quarter-note pulse and can simulate a walking bass line feel while clearly outlining the harmony.
If shell voicings still feel inconsistent or slow, you don’t need more scattered theory. You need structured repetition and guided practice.
The Chord Shell Mastery Program is designed to make shells automatic in your playing. Inside, you’ll get:
If you’re serious about strengthening your left hand and building a solid jazz foundation, this is your next step.
Learn more about the Chord Shell Mastery Program here →
Master the shells. Everything else becomes easier.
Bill Evans revolutionized jazz piano with his elegant and harmonically rich rootless voicings (sometimes called rootless chords). His rootless voicings create a lush, modern sound that allows for smooth voice leading and greater harmonic flexibility. In this lesson, we’ll break down his approach, step by step, so you can integrate these sounds into your playing.
Traditional chord voicings often include the root, but Evans took a different approach—dropping the root and focusing on the upper chord tones and extensions. This technique allows for a more open and sophisticated sound while leaving space for the bass player to establish the harmonic foundation.
With rootless voicings, the emphasis is on:
By omitting the root and sometimes the 5th, these voicings sound smoother and integrate seamlessly into jazz progressions.
For additional study, check out this Rootless Chords Workshop, which provides further exercises and examples to practice these concepts.
For major and minor chords:
For dominant chords:
This structure provides a fuller sound without cluttering the harmony.
Rootless voicings are an essential technique for jazz pianists, allowing for rich, modern-sounding chords while keeping the bass register clear. A Form voicings are structured with the 3rd and 7th as the foundation, followed by the 9th and another color tone to complete the chord.
Let’s break this down step by step for the three most common 7th chords: Major 7, Minor 7, and Dominant 7.
The guide tones are the most defining notes of a chord:
🎹 Diagram 1: Guide Tones (3rd & 7th) Only

Cmaj7:  E - B
Cmin7:  E♭ - B♭
C7:     E - B♭
The 9th adds color and sophistication to the chord, placed above the guide tones.
🎹 Diagram 2: Adding the 9th

Cmaj7:  E - B - D
Cmin7:  E♭ - B♭ - D
C7:     E - B♭ - D
For major and minor chords, we add the 5th, while for dominant chords, we use the 13th (a strong color tone).
🎹 Final A Form Rootless Voicings:

Cmaj7:  E - B - D - G
Cmin7:  E♭ - B♭ - D - G
C7:     E - B♭ - D - A
✅ Play These in Your Left Hand → When comping, you typically play rootless voicings in the left hand, leaving space for basslines or soloing with your right hand.
✅ Use in Chord Progressions → Try applying these voicings in ii-V-I progressions for smooth harmonic movement.
✅ Combine with B Form Voicings → To create voice leading between chords, pair A Form voicings with B Form (where the 7th is on the bottom instead of the 3rd).
After mastering A Form rootless voicings, the next step is to learn B Form voicings. These provide smooth voice leading when moving between chords, making your playing sound more fluid and professional. While A Form voicings start with the 3rd on the bottom, B Form voicings start with the 7th on the bottom.
Just like in A Form, we begin by identifying the guide tones—the 3rd and 7th of each chord. However, in B Form, we invert the order so that the 7th is on the bottom:
🎹 Diagram 1: Guide Tones for B Form Voicings
Cmaj7:  B - E
Cmin7:  B♭ - E♭
C7: B♭ - E The 9th is a key tension in rootless voicings, giving them a modern jazz sound. Add the 9th above the guide tones:
🎹 Diagram 2: Adding the 9th
Cmaj7:  B - E - D
Cmin7:  B♭ - E♭ - D
C7: B♭ - E - D To complete the voicing, we add one final color tone:
🎹 Final B Form Rootless Voicings:
Cmaj7:  B - E - D - G
Cmin7:  B♭ - E♭ - D - G
C7:     B♭ - E - D - A
✅ A Form (3rd on the bottom): Used when moving down in pitch or when starting a ii-V-I progression.
✅ B Form (7th on the bottom): Used when moving up in pitch or as the second voicing in a ii-V-I.
For smooth voice leading, switch between A Form and B Form to minimize hand movement when transitioning between chords.
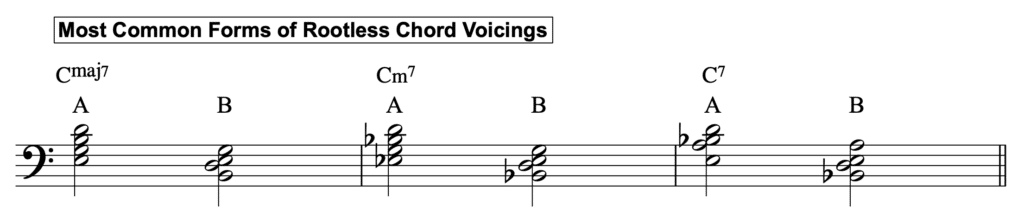
The ii-V-I progression is a core jazz progression, and rootless voicings create smooth, logical movement between the chords.
By modifying the tensions, you can add even more color to your voicings.
These alterations create even richer harmonic textures and work well in modal or post-bop styles.
No, rootless chords can be played in either hand, depending on the musical context and what role each hand is playing.
I came across a statement online that said, "Rootless voicings are played entirely with the left hand." – but this is incorrect. While it’s true that jazz pianists often use rootless voicings in the left hand when accompanying a soloist or playing in a group setting, they can just as easily be played in the right hand.
For example, if you're playing a walking bassline or another left-hand accompaniment pattern, you may want to "comp" (play chords rhythmically) in your right hand. In this case, you'd play rootless voicings in the right hand while your left hand handles the bass. This technique is commonly used when playing in a trio setting (piano, bass, and drums) or when accompanying a soloist, allowing the pianist to provide harmonic support without clashing with the bass player.
If you’d like to see this in action, check out my Learn Jazz Piano (The Basics) course, where I break down rootless chord voicings and how to apply them effectively in different playing situations.
Evans popularized these voicings in the 1950s, influencing pianists like Herbie Hancock and Chick Corea. Listen to Evans' recordings of My Foolish Heart or Autumn Leaves to hear these voicings in action.
Mastering rootless voicings is essential for any jazz pianist who wants to create a full, sophisticated sound while leaving space for bass lines and improvisation. Rootless voicings help smooth out chord transitions and add harmonic richness to your playing.
At Jazzedge Academy, we offer several in-depth lessons to help you master these voicings. Below, we'll walk through a step-by-step approach to playing rootless voicings, followed by links to detailed lessons that will take your understanding even further.
Rootless voicings are commonly used in jazz because they:
✅ Remove the root (which is often played by the bass player).
✅ Focus on guide tones (3rd & 7th) to define the chord quality.
✅ Add rich extensions like the 9th, 13th, or altered tones to create a sophisticated sound.
✅ Improve voice leading, making chord progressions smoother.
Rootless voicings come in two main shapes:
🔹 Example – A Form Rootless Voicing for Cmaj7:
🔹 Example – B Form Rootless Voicing for Cmaj7:
👉 Want a deeper breakdown? Check out Rootless Chord Voicings for a detailed lesson.
Once you've learned A Form and B Form, it's time to apply them in common jazz progressions like ii-V-I and turnarounds.
🎹 Example – ii-V-I in C Major using Rootless Voicings
🔹 Practice tip: Try playing these voicings in both hands and experiment with different rhythms to comp like a pro.
👉 Need more help? Our Guide Tones & Rootless Chords lesson covers this in depth.
Rootless voicings are most often played in the left hand while comping or accompanying a soloist. However, they can also be played in the right hand while the left hand plays a walking bass line.
🎹 Left-Hand Rootless Voicing for G7:
🎹 Right-Hand Rootless Voicing for G7 (while playing bass in the left hand):
👉 For exercises on switching between left- and right-hand voicings, check out Rootless Chords & Group Mastery.
If rootless voicings feel complicated at first, start with simplified versions by using just the guide tones (3rd & 7th) before adding extensions.
🎵 Example – Simplified Rootless Voicing for Cmin7:
From here, you can gradually add the 9th and 5th (or 13th for dominant chords).
👉 Need a simple approach? Watch Simplified Rootless Jazz Chords for an easy-to-follow guide.
For an in-depth, structured approach to mastering rootless voicings, explore these lessons:
🎓 Rootless Chords & Group Mastery – A complete course on comping, progressions, and advanced rootless voicings.
🎓 Rootless Chords Exposed – Clears up common confusion around rootless chord construction.
🎓 Guide Tones & Rootless Chords – How to transition from simple guide tones to full rootless voicings.
🎓 Simplified Rootless Jazz Chords – A step-by-step approach to learning these voicings without overwhelm.
🎓 Rootless Chord Voicings – Learn the full structure of rootless voicings with real jazz applications.
By following this step-by-step breakdown, you’ll develop a strong foundation in rootless voicings and be able to apply them in any jazz setting.
Would you like me to add practice exercises or audio examples to this section? 🎹😊
Mastering Bill Evans' rootless voicings will transform your jazz playing, making your comping sound richer and more sophisticated. Practice these voicings in different keys and progressions, and soon they’ll become a natural part of your jazz vocabulary.
Want to dive deeper? Check out Jazzedge Academy membership options for in-depth lessons and guided practice sessions!
In the Intermediate Boogie Woogie Piano lesson you'll learn this slick blues piano riff, along with a Boogie Woogie left hand bass line and New Orleans style straight eighth-note rhythm. The bass line includes the I-IV-V chord progression of F7, Bb7, and C7, and is followed by a comping element in the right hand.
The lesson then covers two closely related riffs to practice, along with a tutorial on how they fit over the chord changes.
The lesson ends with a demonstration of combining the left hand bass line with the riffs and playing them together. Finally, another bass line that is more of a swing rhythm is introduced.
Now, as you practice this riff, it's important to pay attention to the timing of each note. This is especially important because the right hand riff is played over the left hand bass line, which is in a different rhythmic feel.
As you may recall, the bass line is a straight eighth note feel, while the right hand riff is played in a swung eighth note feel. So it's important to practice playing these two elements together until they are locked in and sound tight.
Here is the sheet music for the first riff:
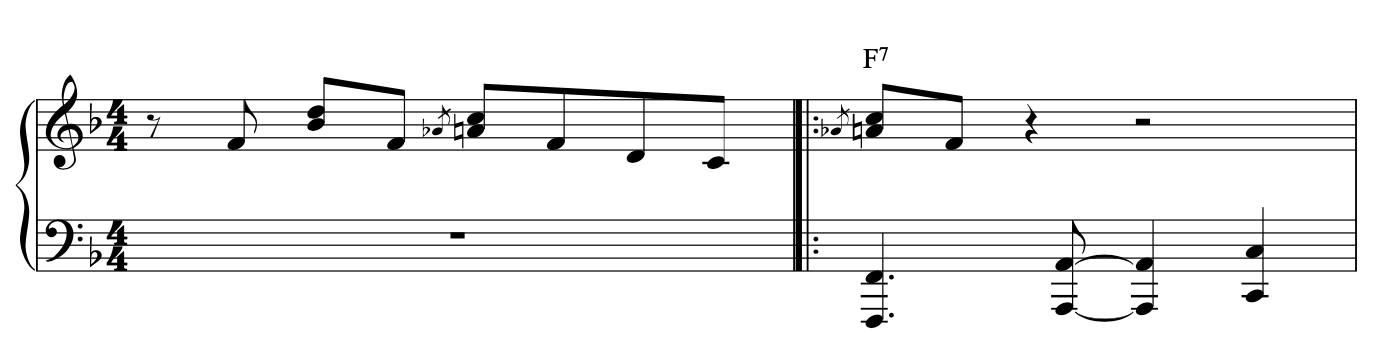
One way to do this is to use a metronome set to a slower tempo, and practice playing the bass line with your left hand and the right hand riff on top of it. Once you feel comfortable with the timing and rhythm of both elements, you can gradually increase the tempo to a faster pace.
Once you have mastered the first riff, it's time to move on to the second riff. The second riff is very similar to the first, but with a slightly different pattern of notes.
Again, it's important to pay attention to the timing of each note and practice playing it in sync with the left hand bass line.
If you want to learn more about blues piano and boogie woogie, check out our Boogie Woogie piano course.
Once you have mastered both riffs, you can start experimenting with different combinations of riffs and bass lines. This is where the real fun begins!
By using different combinations of riffs and bass lines, you can create a virtually unlimited number of boogie woogie solos, each with its own unique sound and feel.
To take your boogie woogie playing to the next level, it's important to continue practicing and mastering new techniques and patterns.
There are many other riffs and bass lines that you can learn, and as you master them, you can start incorporating them into your playing.
In addition to practicing on your own, it's also a good idea to seek out other musicians to play with.
Playing with other musicians can help you develop your timing, rhythm, and overall musicianship. It can also be a lot of fun!
In conclusion, boogie woogie is a fun and exciting style of music that has been around for nearly a century. By learning and mastering new techniques and patterns, you can take your boogie woogie playing to the next level and create your own unique sound and style. So keep practicing, keep experimenting, and most importantly, keep having fun!
If you're a jazz or blues piano player, then you know the importance of being able to improvise and come up with your own unique phrases on the spot. However, even the most seasoned players can hit a creative roadblock from time to time, which is why having a collection of licks at your disposal can be incredibly useful.
In this lesson, we'll go over 10 different jazz and blues licks that you can add to your arsenal. Licks are short, catchy phrases that can be used as a starting point for improvisation or as a way to add some spice to your playing. The licks we'll cover here can be used on dominant or minor chords, and can be transposed to different keys to fit any tune you're playing.
The first lick we'll cover is a four-note phrase that works well on a C minor 7 chord. The right hand fingering is 4-3-2-1-2, and the left hand can play a simple pattern of alternating bass notes. To get the most out of this lick, it's best to break it up into two patterns and practice them separately. Vocalizing the pattern as you play can also help with memorization.
Another variation of this lick is to use it over a C7 chord. This can create a bluesy sound that works well on a shuffle rhythm. The left hand can use a simple walking bass line, and the right hand can play the same pattern as before. This lick can also be used on an F7 chord by simply moving the pattern up a perfect fourth.
The second lick we'll cover is a classic blues lick that works well on a dominant 7 chord. The right hand fingering is 5-3-2-1, and the left hand can play a simple walking bass line. This lick is based on the minor pentatonic scale and can be transposed to different keys easily.
The third lick is a more complex phrase that works well on a minor 7 chord. The right hand fingering is 4-2-1-2-4-2, and the left hand can play a simple walking bass line. This lick can create a jazzy sound that's perfect for ballads or slower tunes.
The fourth lick is another classic blues phrase that's based on the major pentatonic scale. The right hand fingering is 5-2-1, and the left hand can play a simple walking bass line. This lick works well on a dominant 7 chord and can be transposed to different keys easily.
The fifth lick is a more advanced phrase that works well on a minor 7 chord. The right hand fingering is 5-4-2-1-2-5-4, and the left hand can play a simple walking bass line. This lick can be a bit challenging to play at first, but once you get it down, it can create a beautiful, jazzy sound.
The sixth lick is a simple, yet effective phrase that works well on a dominant 7 chord. The right hand fingering is 4-3-1, and the left hand can play a simple walking bass line. This lick can create a catchy, upbeat sound that's perfect for fast-paced tunes.
The seventh lick is a jazzy phrase that works well on a minor 7 chord. The right hand fingering is 5-4-2-1-2-4-2, and the left hand can play a simple walking bass line. This lick can be a bit challenging to play at first, but once you get it down, it can create a beautiful, sophisticated sound.
